Saturday, February 23, 2013

Look what I received!

I received all of the following items in the mail yesterday from Australia: 


A Christmas Story pattern book by Anni

Downs, A Meme's quilt pattern (in a Christmas theme), A Gail Pan pattern (in a Christmas theme), and A Hugs and Kisses pattern (also in a Christmas theme).
These are all gifts from The Christmas Beetle.  You can visit them on line at The Christmas Beetle or on their facebook page

Friday, February 22, 2013

Matryoshka Dolls - rethinking


Since my last post on the matryoshka dolls I have been practicing curved piecing.  To be precise the 6 minute circle.  I am using the book Pieced Curves So Simple by Dale Fleming  that my niece gave me a few Christmas's ago.  My circle and heart came out very nice, except the fabric choices. (Using up lots of old scraps and fabric people have given me since they know that I quilt.)


If you look at the close-ups you can see that the circle looks set in and the heart appears to puff out, this is because of how the seems are pressed. If you press them toward the background it appears set in.  If you press the seams toward the center it looks more like applique'.


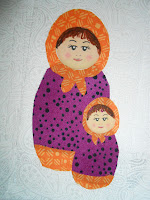
After doing these,  I had the bright idea to try and set in half inch circles. Why 1/2 inch? I wanted to set in the faces of my matryoshka dolls in the scarves.  then I decided to sew the bodies together with curved piecing as well.  I also wanted to set the dolls in the background.  This way I wouldn't have to satin stitch all the edges.  With such small pieces the satin stitch is a little heavy.  Piecing  will also make it easier to add bead and other embellishments.

It worked.  Dispite the fact that I used more miss matched scraps, I think it worked great.  Now, I will be going back and remaking the finished blocks with curved piecing.  Yeah!


skill builder challenge 2

I finished the Em Dash Block and The Mood last week, just couldn't locate the camera.
This week was practicing basic piecing skills and sewing with bias seams.  I loved seeing all the different colors and arrangements done by the others taking this challenge.  You can check out their progress at our flicker group. Here are my blocks, now to get them ready for our free-motion quilt lesson.

Tuesday, February 12, 2013

Matryoshka Dolls

Here are a few of the first Matryoshka dolls for my challenge quilt.  I will use a tear-a-way stabilizer and satin stitch around each doll in different colors.   The backgrounds are all the same, but the pictures are not very good as I am trying to photograph with my new camera.


Saturday, February 9, 2013

2013 Challenge Quilt

Like I really need another quilt project. Our guilds challenge this year is to make a miniature quilt using the 8 fabrics you received, and no blocks larger than 6".  At least 12 fabrics must be used (not a problem I have over 20 picked and have to eliminate some) and at least two techniques. Here is a picture of my fabrics.  Everyone got some combination of  8 of 20 different fabrics and cuts of 6 1/2" inches wide down to 2 1/2".  Every bag is different.

Okay, diffidently not my usual color pallet or fabric choices.  My first idea was add more teal and fine a fabric with most of these colors. 

My thinking was use the stripe and add the orange stripe to it for sashing between the blocks.  Now that my quilt is planned I chose wilder colors and am not going to use these.  Here is a picture of my sashing color. 

Really! This one!  No I haven't gone crazy. I decided to make matryoshka dolls, Russian nesting dolls. I and going to sash the blocks with this orange and some kona black.  The dolls will be on a white on white paisley design.  Each doll or set will be of a wide variety of colors.

I have designed my faces and will print them on fabric.  I have 5 sizes chosen for the dolls right now.  I have an array of white block sizes cut out and a few dolls fused and ready for applique.

Sunday, February 3, 2013

Skill Builder BOM

This is the color pallet I will be using for this project.  I have finished making and quilting blocks one and two. I have also chosen my thread colors for this project.  The coppery brown is for the back.  My quilt back is made of material I had in my stash.  I thought they were all fat quarters until I started ironing and cutting them.  Oops!  Well to stick with my goal of use what you have,  I just made a few randomly pieced blocks.  Here is a picture of the blocks  laid  out on the playroom floor.


I quilted my quilts as shown in the Skill Builder's Block of the Month videos.   I used my Bernina patchwork edition for this quilting.  The use of the thread holder and using an embroidery needle prevented thread problems I had had in the past.  Thanks so much for the tip about the sharp needles Alyssa.
I simply used unclosed quilting pins to baste this since it is such a small project.  Here are som pictures of my FMQ.


Envision, Explore, Evolve week 2

Busy, busy busy, but nothing seems to get done.

This week I have gotten a little done on my godess quilts inspired by Leah Day's free-motion quilting project.
Quilt 1, the one drawn and colored with Seta color and Ink intense pencils has not been touched.  I am having trouble deciding on what color to use as an outline.
 I had been thinking dark brown and then someone suggested purple.  I also was thinking about matching the thread to the  colors on the quilt. This sure would involve a lot thread changes.  Any ideas?


Quilt 2 - The batik quilt has all been outline in white.  The words need to be finished and all the thread ends need to be buried.  Will do this while watching Downton Abby tonight.

Qui;t 3 - The black quilt has been free motion quilted in white.  The words Envision, Explore,  and Evolve have been quilted.
Not too bad for a first try.


I used Jacquard sapphire blue and emerald green on the world.  The only Lumier paint I had was called Hi Lite Blue.  I actually thought it was white when I used it, until i looked at the name.  Anyway the blue did not show like I wished it had, so I brushed some of the Lumier paint over it while it was still wet.  It blended great and showed very nicely.  I put the green on and then brushed the Hi Lite Blue on to it too.  The puffiness of the batting really shows now that the world has been painted.  I used high loft batting because that is what I had and my goal this year is to use what I have.  Hopefully, when I quilt over the paint it will take care of itself.


I realized that my words should have been quilted the other direction to flow more with the quilt.  a lesson learned for the other two quilts.  I am not about to try to unpick this.

Tips for the week : two important tips I used this week that helped me with the problems of trying to use my Pfaff for freemotion quilting.  First: I used a separate thread stand.  This kept the thread from getting caught and ended my needle breaking spree.  Second: I used an embroidery needle instead of a microtex sharp.  This stopped the shredding of the thread.  Yeah!